下顎線脫墨
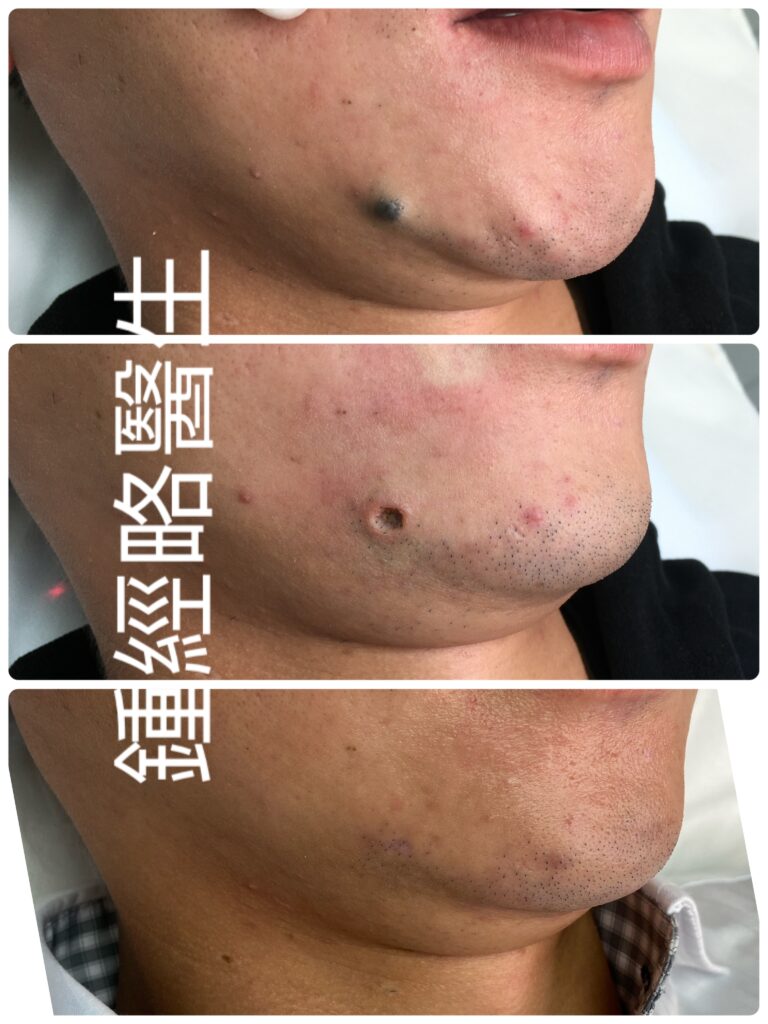
CO₂ Laser Ablation of a Benign Jawline Nevus Near the Antegonial Notch: Anatomical Challenges and Hybrid Surgical Strategies
Introduction
Ablating a benign cutaneous nevus along the jawline presents a complex clinical task. Although the lesion itself may be histologically straightforward, its location near the antegonial notch introduces high-stakes structural, vascular, and neurological risks.
In this region, a surgeon must navigate the high-flow facial artery, the marginal mandibular branch of the facial nerve, deep terminal hair follicles, and high-tension mechanical forces. When a benign nevus extends deep into the reticular dermis, relying solely on CO2 laser vaporization can cause severe thermal spread, permanent localized alopecia, or an indented scar.
Consequently, managing a deep nevus along the lateral chin requires a hybrid approach. The surgeon uses precise CO2 laser ablation to clear the primary lesion, then transitions to surgical conversion, undermining, and primary closure. This combined strategy protects deep anatomical structures while delivering an optimal aesthetic outcome.
1. Identification of the Antegonial Notch
The antegonial notch (also termed the facial notch or mandibular notch) is a smooth concavity along the inferior border of the mandibular body. It sits approximately 2.0 to 3.0 cm anterior to the angle of the jaw (gonion).
[ Angle of Jaw (Gonion) ] ──► Slide finger along lower border ──► [ ANTEGONIAL NOTCH ] ◄── Anterior border of Masseter
Clinically, the surgeon identifies the notch through step-by-step physical palpation:
- Palpate the Lower Mandibular Border: First, trace the hard inferior edge of the mandible forward from the jaw angle toward the chin.
- Locate the Anterior Masseter Border: Then, ask the patient to clench their teeth tightly. The notch lies directly at the anterior margin of the contracting masseter muscle.
- Feel the Indentation: Finally, slide your fingertip into the subtle upward curve along the bone. Light pressure inside this concavity reveals the bounding pulse of the facial artery.
2. Clinical Significance of the Antegonial Notch
The antegonial notch serves as the critical neurovascular gateway of the lower face. At this precise point, major structures transition from the deep neck into the superficial facial soft tissues:
- Vascular Gateway: On one hand, the facial artery and facial vein hook over the lower border of the mandible directly inside the notch.
- Neurological Gateway: On the other hand, the marginal mandibular branch of the facial nerve (CN VII) crosses the mandibular border directly over or within 1.0 cm of the notch, running deep to the platysma muscle.
- Surgical Landmark: So, identifying the notch allows the clinician to map out the exact “danger zone” for deep thermal energy, deep suture placement, and surgical undermining.
3. Protecting the Facial Artery from Thermal and Mechanical Injury
The facial artery is a high-flow branch of the external carotid system. Accidental transection or deep thermal injury can cause rapid subcutaneous hematoma or localized tissue ischemia.
To prevent vascular compromise during CO2 laser ablation and closure:
[ Superficial Dermis / Subcutis ]  ──► SAFE ZONE (Contains microcapillaries only)
───────────────────────────────────────────────────────────────────────────── (Platysma / SMAS Fascia)
[ Deep Sub-Platysmal Space ]      ──► DANGER ZONE (Facial Artery & Vein)
- Maintain a Superficial Plane: Keep laser ablation and surgical dissection strictly within the dermis and upper subcutaneous fat. This is because the facial artery runs in the sub-platysmal plane deep to the SMAS fascia.
- Utilize Ultrapulse Mode & Active Thermal Management: Continuous-wave (CW) laser mode allows heat to conduct downward into deep tissue layers. In contrast, using short, high-peak-power pulses (Ultrapulse) limits thermal spread below the thermal relaxation time of the tissue.
- Pinpoint Hemostasis: If small subcutaneous vessels bleed, apply precise bipolar electrocautery under direct vision. Avoid deep, unmonitored monopolar coagulation near the notch.
4. Managing Deep Hair Follicles and Preventing Permanent Alopecia
Terminal beard hair follicles along the jawline extend 2.0 to 3.5 mm deep into the lower reticular dermis and upper subcutaneous fat.
If a nevus extends to this depth, chasing the melanocyte nests with continuous laser ablation will vaporize the hair follicle bulbs. Allowing such a deep laser defect to heal by secondary intention results in a hairless, shiny, indented scar—creating a visible bald patch in the patient’s beard.
[ Deep Laser Vaporization ] ──► Destruction of Follicle Bulbs ──► Secondary Intention ──► Bald Patch & Indented Scar
                                                                      │
                                                                      ▼ (Prevented By)
                                                                      │
[ Converting to Ellipse & Primary Suturing ] ──────────────► Aligns Adjacent Hair-Bearing Skin
Surgical Solution:
When visual inspection reveals that laser ablation has reached a depth where viable hair follicle bulbs no longer exist, stop laser vaporization immediately and transition to primary surgical closure:
- Excise the laser-treated floor as a neat surgical ellipse.
- Bring the adjacent hair-bearing skin edges together with primary sutures.
- Aligning these margins hides the narrow linear scar within the natural beard line and eliminates the hairless defect entirely.
5. High-Tension Dynamics of the Jawline
The mandibular region experiences intense, multi-directional dynamic tension caused by mastication, speech, swallowing, and neck rotation (driven by the platysma, depressor anguli oris, and masseter muscles).
Closing a round or dish-shaped laser defect directly along the jawline under high tension leads to wound dehiscence, suture mark indentations (“railroad tracks”), or wide, hypertrophic scarring.
In order to absorb these dynamic forces, execute a multi-layered closure:
- Place deep dermal, tension-relieving sutures (e.g., 4-0 or 5-0 PDS/Vicryl) to approximate the deep tissue and take all mechanical stress off the skin surface.
- Apply superficial 6-0 monofilament sutures to gently align the epidermal edges without tension.
6. Aligning Incisions with Relaxed Skin Tension Lines (RSTLs)
On the lateral chin and jawline, Relaxed Skin Tension Lines (RSTLs) run horizontally or obliquely, parallel to the mandibular border and natural neck creases.
  ( Incorrect: Vertical Incision )             ( Correct: Horizontal Incision along RSTLs )
               │                                                 ═════════════════
               ▼                                                         ▼
  Cross-Tension Pulls Scar Wide                 Dynamic Tension Disappears into Natural Crease
- Orientation: Align any surgical extension or elliptical conversion strictly parallel to these horizontal RSTLs.
- Biomechanical Benefit: Closing a wound along RSTLs allows everyday facial movements to compress the wound edges together rather than pulling them apart, yielding a fine, flat scar line.
7. Converting Laser Defects, Undermining, and Preventing “Dog-Ear” Puckering
CO2 laser ablation leaves a circular, dish-shaped defect. So, attempting to suture a circular hole directly causes the tissue at the poles to gather and bulge upward, forming unsightly standing cone deformities (“dog-ears”).
[ Round Laser Defect ] ──► Excision of Apical Triangles ──► [ 3:1 Ellipse along RSTLs ] ──► Flat, Seamless Closure
Step-by-Step Prevention Strategy:
- Convert the Circular Defect into a 3:1 Ellipse: First, extend the superior and inferior poles along the RSTLs. Remove small apical triangles of skin to create a classic surgical ellipse with a 3:1 length-to-width ratio.
- Perform Precise Subcutaneous Undermining: Then, insert fine dissection scissors into the upper subcutaneous fat layer (just beneath the dermis). Advance 5 to 10 mm around the entire perimeter of the wound.
- Relieve Margin Tension: Finally, undermining frees the skin from underlying attachments, allowing the skin edges to glide smoothly toward the midline without puckering or standing cone formation.
8. Preserving the Platysma/SMAS Layer to Protect the Marginal Mandibular Nerve
The marginal mandibular branch of the facial nerve (CN VII) provides motor innervation to the lower lip depressors (depressor labii inferioris, depressor anguli oris, and mentalis). So, damage to this nerve causes severe lower lip asymmetry, an inability to show the lower teeth on the affected side, and drooling.
Neurological Preservation Protocol:
- Respect the Anatomical Plane: The nerve runs deep to the platysma muscle and SMAS fascia within the sub-platysmal fat layer.
- Keep Dissection Superficial: During undermining and suture placement, stay strictly superficial to the platysma fascia (within the subcutaneous fat layer).
- Avoid Deep Suture Anchor Biting: When placing deep tension-relieving dermal sutures, catch only the deep dermis and upper subcutaneous fat. Never take deep anchor bites into the platysma muscle or periosteum near the antegonial notch.
Summary Matrix of Regional Risks and Surgical Mitigations
| Clinical Challenge | Underlying Danger | Surgical & Technical Mitigation |
| Antegonial Notch Proximity | High-risk area containing facial artery, vein, and motor nerve | Palpate pre-operatively to map the vascular notch and nerve trajectory. |
| Facial Artery Injury | High-flow arterial bleeding / deep hematoma | Limit ablation and dissection to the dermis; use Ultrapulse mode and bipolar cautery. |
| Follicle Loss / Alopecia | Bald patch in beard due to deep laser heat | Convert deep laser defect into a surgical ellipse and suture to align hair-bearing skin. |
| High Jawline Tension | Scar widening, dehiscence, hypertrophic scar | Place deep dermal tension-relieving sutures (4-0/5-0 PDS) to absorb mechanical load. |
| “Dog-Ear” Puckering | Bulging tissue cones at wound poles | Extend round defect into a 3:1 ellipse along RSTLs; perform subcutaneous undermining. |
| Marginal Mandibular Nerve Injury | Lower lip paralysis and smile asymmetry | Keep all undermining and deep suture placement strictly superficial to the platysma fascia. |
引言
切除位於頜緣(下頜骨邊緣)的良性皮膚痣是一項複雜的臨床任務。儘管病灶本身在組織學上相對簡單,但其鄰近 Antegonial Notch(切牙灣/下頜切跡)的位置帶來了極高風險的結構、血管及神經挑戰。
在此區域,外科醫生必須妥善處理高流量的面動脈、面神經下頜緣支、深層終毛毛囊以及高張力的機械拉力。當良性痣延伸至網狀真皮層深處時,單靠 CO2 二氧化碳激光汽化會引致嚴重的熱傳導擴散,造成永久性局部脫髮或凹陷性疤痕。
因此,處理下巴外側及頜緣的深層痣需要採用混合治療策略:先利用精準的 CO2 激光汽化清除主要病灶,隨後轉為切口轉換、皮下剝離(Undermining)及一期縫合。此聯合策略既能保護深層解剖結構,又能達到最佳的美觀效果。
1. 定位 Antegonial Notch(切牙灣/下頜切跡)
Antegonial Notch(亦稱 Facial Notch 或 Mandibular Notch)是沿下頜骨體下緣的一個平滑凹陷。它位於下頜角(Gonion)前方約 2.0 至 3.0 cm 處。
[ 下頜角 (Gonion) ] ──► 沿下緣向前滑動手指 ──► [ ANTEGONIAL NOTCH ] ◄── 咬肌前緣
在臨床上,醫生透過按部就班的觸診定位此切跡:
- 觸診下頜骨下緣: 首先,手指從下頜角沿著硬朗的下頜骨下緣向前滑向下巴。
- 定位咬肌前緣: 然後,囑患者緊咬牙齒。切跡正好位於收縮的咬肌前緣。
- 感應凹陷處: 最後,手指滑入骨骼沿線微小的向上彎曲凹陷中。在此凹陷內稍加施壓,即可感應到面動脈強有力的搏動。
2. Antegonial Notch 的臨床重要性
Antegonial Notch 是面下部關鍵的神經血管通道。在此精確位置,重要結構從頸部深層過渡至面部淺層軟組織:
- 血管通道: 面動脈(Facial Artery)與面靜脈(Facial Vein) 直接在切跡內跨越下頜骨下緣。
- 神經通道: 面神經下頜緣支(Marginal Mandibular Branch of CN VII) 在切跡直接上方或 1.0 cm 範圍內跨越下頜骨邊緣,走行於頸闊肌深面。
- 手術解剖標誌: 定位此切跡可讓醫生精確劃定深層熱能、深層縫線放置及手術剝離的「危險區」。
3. 保護面動脈免受熱能與機械性損傷
面動脈是頸外動脈系統的高流量分支。意外切斷或深層熱損傷可引致快速的皮下血腫或局部組織缺血。
為防止在 CO2 激光汽化及縫合過程中損傷血管:
[ 淺層真皮 / 皮下脂肪 ] ──► 安全區(僅含微血管)
───────────────────────────────────────────────────────────────────────────── (頸闊肌 / SMAS 筋膜)
[ 深層頸闊肌下間隙 ]   ──► 危險區(面動脈與面靜脈)
- 維持淺層操作平面: 將激光汽化與手術剝離嚴格限制在真皮層及皮下脂肪淺層內。面動脈走行於 SMAS 筋膜深面的頸闊肌下平面。
- 採用 Ultrapulse 超脈衝模式與主動熱能管理: 連續波(CW)激光模式會使熱能向下傳導至深層組織。使用短脈衝、高峰值功率的超脈衝(Ultrapulse)可將熱擴散控制在組織的熱弛豫時間(TRT)以下。
- 精準止血: 若皮下小血管出血,請在直視下使用精準的 雙極電凝(Bipolar Electrocautery)。避免在切跡附近使用深層且無監測的單極電凝。
4. 處理深層毛囊與預防永久性脫髮
頜緣沿線的終毛鬍鬚毛囊延伸至網狀真皮下層及皮下脂肪上層,深度達 2.0 至 3.5 mm。
若痣延伸至此深度,以連續激光汽化追尋黑色素細胞巢會蒸發毛囊球(Hair Follicle Bulbs)。讓如此深層的激光創面進行二期癒合(Secondary Intention)會導致無毛、發亮且凹陷的疤痕——在患者的鬍鬚區形成明顯的禿髮斑。
[ 深層激光汽化 ] ──► 破壞毛囊球 ──► 二期癒合 ──► 禿髮斑與凹陷性疤痕
                                                       │
                                                       ▼(預防方式)
                                                       │
[ 轉為橢圓形切除並一期縫合 ] ─────────────────► 對齊鄰近帶毛髮皮膚
手術解決方案:
當肉眼觀察顯示激光汽化已達到不再存有活性毛囊球的深度時,應立即停止激光汽化,並轉為一期手術縫合:
- 將經激光處理的創面底座整齊切除為橢圓形切口。
- 使用一期縫線將鄰近帶毛髮的皮膚邊緣對合。
- 對齊這些創緣可將狹窄的線狀疤痕隱藏於自然鬍鬚線內,並徹底消除無毛缺陷。
5. 頜緣的高張力力學動態
下頜區域承受著由咀嚼、說話、吞嚥及頸部旋轉(由頸闊肌、降口角肌及咬肌帶動)引起的強烈、多方向動態張力。
在高張力下直接縫合頜緣處的圓形或盤狀激光創面會導致傷口裂開、縫線痕跡凹陷(「鐵軌樣」疤痕)或增生性疤痕。
為吸收這些動態張力,請執行多層縫合:
- 放置真皮深層減張縫線(如 4-0 或 5-0 PDS/Vicryl),以對合深層組織並消除表皮層的所有機械應力。
- 使用淺層 6-0 單絲縫線輕柔對合表皮邊緣,切勿過緊。
6. 沿放鬆皮膚張力線(RSTLs)對齊切口
在下巴外側及頜緣,放鬆皮膚張力線(RSTLs)呈 水平或斜向 走行,與下頜骨邊緣及自然頸紋平行。
  ( 錯誤:垂直切口 )                            ( 正確:沿 RSTLs 水平切口 )
           │                                                 ═════════════════
           ▼                                                         ▼
  交叉張力拉開疤痕                                dynamic 張力消失於自然皮紋中
- 方向: 將任何手術延伸或橢圓形轉換嚴格平行於這些水平 RSTLs。
- 生物力學效益: 沿 RSTLs 縫合傷口可讓日常面部動作將傷口邊緣擠壓在一起,而非相互拉開,從而形成細小平整的疤痕線。
7. 轉換激光創面、皮下剝離與預防「狗耳」(Dog-Ear)褶皺
CO2 激光汽化會留下圓形、盤狀的創面。直接縫合圓形孔洞會導致兩極的組織積聚並向上隆起,形成不美觀的立體圓錐狀畸形(「狗耳」)。
[ 圓形激光創面 ] ──► 切除兩端三角尖 ──► [ 沿 RSTLs 呈 3:1 橢圓形 ] ──► 平整無痕縫合
預防步驟策略:
- 將圓形創面轉換為 3:1 橢圓形: 沿 RSTLs 延長上極與下極。切除小塊頂端皮膚三角形,形成長寬比為 3:1 的經典手術橢圓形。
- 進行精準皮下剝離(Undermining): 將精細解剖剪插入 皮下脂肪上層(緊貼真皮下層)。沿傷口整個外圍推進 5 至 10 mm。
- 釋放創緣張力: 剝離能將皮膚從下方黏連組織中釋放,使皮膚邊緣平滑地向中線滑行,不會產生褶皺或形成立體圓錐。
8. 保留頸闊肌/SMAS層以保護面神經下頜緣支
面神經下頜緣支(Marginal Mandibular Branch of CN VII) 支配下唇降肌(降下唇肌、降口角肌及頦肌)的運動。此神經受損會導致嚴重的下唇不對稱、患側無法露出下排牙齒以及流口水。
神經保留方案:
- 尊重解剖平面: 神經走行於頸闊肌下脂肪層內,部位深於頸闊肌及 SMAS 筋膜。
- 保持淺層解剖: 在剝離及放置縫線期間,嚴格維持在 頸闊肌筋膜淺層(皮下脂肪層內)。
- 避免深層縫線錨定: 放置深層真皮減張縫線時,僅扣住真皮深層及皮下脂肪上層。切勿在 Antegonial Notch 附近深扣至頸闊肌或骨膜。
區域風險與手術對策總結表
| 臨床挑戰 | 潛在危險 | 手術與技術對策 |
| 鄰近 Antegonial Notch | 含有面動脈、靜脈及運動神經的高風險區域 | 術前精準觸診,標記血管切跡與神經走行軌跡。 |
| 面動脈損傷 | 高流量動脈出血/深層血腫 | 將汽化與解剖限制於真皮層;採用超脈衝模式與雙極電凝。 |
| 毛囊缺失/脫髮 | 深層激光熱能引致鬍鬚區禿髮斑 | 將深層激光創面轉換為手術橢圓形並縫合,以對齊帶毛髮皮膚。 |
| 頜緣高張力 | 疤痕增寬、傷口裂開、增生性疤痕 | 放置真皮深層減張縫線(4-0/5-0 PDS)以吸收機械負載。 |
| 「狗耳」褶皺 | 傷口兩極組織隆起圓錐 | 將圓形創面延伸為沿 RSTLs 的 3:1 橢圓形;進行皮下剝離。 |
| 面神經下頜緣支損傷 | 下唇癱瘓及笑容不對稱 | 所有剝離及深層縫線放置均嚴格保持在頸闊肌筋膜淺層。 |